Sunday, December 30, 2012

Glue Stick

Merry Christmas and Happy New Year!


We had an awesome Christmas!  We took the family up North and we got to learn something new.  Cross Country Skiing.
I sent my cards out late this year...on purpose!  I wanted to make sure everyone got a copy of this picture of our family.  We had an amazing time and stayed at the most amazing place.  But that is a story for another time.


So why do I have a post on glue sticks at Christmas you wonder? 
 Well, because I absolutely cannot stand to lick envelopes.  Yuck!  I always spend extra money to buy the self adhesive office envelopes but for my Christmas cards I never did.  I always worried about having enough cards for a cheaper price.  This year I had to add a few extra cards to the ones I picked up last year so I actually found self-adhesive ones and smiled when I put them in my cart.

For the envelopes that were not self adhesive I grabbed a half used glue stick that one of my kids brought home at the end of a school year.  It was wonderful!  So much easier than a wet towel.  And easier than bribing the nearest kid to lick them. (They are all getting too old now so it doesn't work anymore.)
I am all about recycling when possible.  Especially since 3 of the 4 kids bring home about half of the ones I send to school all half or barely used.

 Some other uses I do with these are:

Christmas projects for the kids!
I keep one in my bill box, just in case I have to actually use an envelope these days.
Office.
I put a few extras in my scrap booking caddy, since even at my most prepared I might run out of my favorite tape runner, or I can step up and help out a friend when they might have no adhesive.
The kitchen junk drawer (you just never know).
My youngest daughter has an old school box with scissors, washable markers, and glue sticks to glue all her scraps of paper.

Budget/Organizing Tip:

This is also the time of year that I dig out the old school supply list that has just been laying around under a stack of other papers, make a copy of it and stick it in my purse.  Why, you ask?  Well, I have 4 kids to buy school supplies for.  I have found that if I start to buy a couple things a week during the school year it doesn't seem to hurt as bad when school starts back up.  


I like to start after Christmas.  I try to dedicate no more than $5.00 per week.  I have a 10 gallon plastic container I keep all the supplies in.  (Put a copy of your list in the bucket too, not much changes year to year) Then in July or August my kids can shop in the container and we load the backpacks.
My school supply store
Yes, somethings are cheaper that week before school starts so save out for those items if you want.  I tend to grab items like glue sticks, binders, pencils and pens from Sams Club when we are close to one.  (My last package of glue sticks from Sams ended up being a few cents cheaper per stick than the sale ones before school started.)
If you take on this idea yearly, make sure you check your inventory and cross off what you don't need, then you don't have to worry about it, unless it's a really good deal.
I also buy the big package of Kleenex's at Sams Club and divide it up per kid.

It's just so nice to not have to deal with the stress of it all before school starts when you are dealing with so much other stuff, as well as other school expenses that take an unexpected chunk out of your wallet, for example...school lunches, pictures, snack fees, sports fees, shop fees, parking fees, you get the point.
One thing to consider as well, I hit Menards a couple of weeks after school started and they still had school supplies on sale for .85.  Then they had a .50 rebate.  Limit of ten items.  These were great items like pencil sharpeners and colored pencils, as well as other things.  So I loaded up.  I find that you always need colored pencils.  My sophomore even needed some last year for Geometry and this year for Biology.  I was surprised, I thought once she was in high school she wouldn't need them anymore.   My final cost was .35 per item.  WOW!

Good luck.


Thursday, December 13, 2012

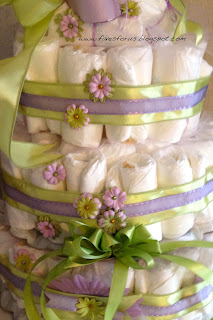
Diaper Baby Cakes


No, you don't eat it!  


On top of this one I put on a pair of paper booties in lavender.

This is a wonderful baby shower gift that I have been enjoying making lately.  In fact, I made these two before Thanksgiving and I am making two more in the next few days. It is a great centerpiece for the gift table, then afterwards the future dad can disassemble it to be used after the baby arrives. 

Supplies:
Box of size 2 diapers
hot glue
1 wide colored ribbon
1 thin colored ribbon
3 spools of  10 ft length 1/8" thin white ribbon to tie diapers with (you can also do a coordinating color instead.)
1 large cake cardboard circle
1 smaller cake cardboard circle
decorations such as tulle, flowers, paper booties, baby bottles, pacifiers (whatever your mind can imagine)

To start out I cut my ribbon into strips to tie the diapers with.

Cut your 1/8"  ribbon into about 12 1/2 inches long pieces

To save on hot glue, I roll up the diaper and tie the ribbon around it to hold it closed, it's looks cute too.


You could even recruit some helpers to roll the diapers while you tie.

Cake cardboards,  I use two different sizes.
First layer

For the first layer I start with the cardboard and put a little hot glue in a small area to stick a couple of diapers down with.  I continue this process all around the outside edge of the cardboard until I have my circle of diapers.  Yes the diapers will stay standing up if you let the glue set.  I stick a few diapers in the center to hold the shape and then I add the wide ribbon and hot glue that on as well.  I go all the way around the diaper layer and give a little dab of hot glue here and there to hold the ribbon in place.  Once the ribbon is secure I fill in the center with more rolled up diapers.  

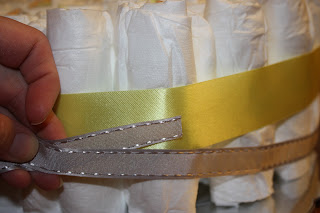
Adding the other ribbon color.
I hot glue the smaller ribbon right on top of the wider ribbon.


This becomes the back.

These pictures are of the bottom layer.  To jazz up the cake a little bit I glued some coordinating tulle to the diapers so it will stick out past the next layer a little bit when you place the next layer on top.  I do keep the bottom and second layer separated.  The cardboard sits nicely for the final display but it is much easier to move around when the two cardboard layers can sit, and travel separately.

 For the second layer, use the smaller cardboard and repeat.


Then make one more layer on top of that one.  The third layer is glued right to the second layer.  For the very top, I like to lay down two diapers and glue, then angle a couple more over the two laying down and glue those on.  Then jazz it up with a bow that has some long tails, or some tulle.

Some flowers to decorate with.
I even had extra supplies to made the momma a diaper corsage.
Not the best picture but this is the top of the diaper cake with the booties.
Then you just hot glue all your decorations on, just a little dab goes a long ways.

Have fun!

Thursday, November 8, 2012

Gift Tags


Wouldn't a homemade gift tag look great on that special gift?  This is a fun project to do.  You can even use your scrap paper to make all kinds of tags, for all occasions.
I bet your thinking, who has time for that???  Well, you do!  It doesn't take too long and it's even better if you would like to make a lot you can assembly line the steps.
I made this as an example for some make and takes, so I cut lots of paper and got a lot of stuff coordinated for everyone to make this and it might have taken an hour.


Start out with your largest piece of paper 2 1/4" x 4".


Your next piece of paper will be 2" x 3" and you will want to round off all 4 of your corners.


And your last piece of paper is 1 3/4" x 2 3/4", round those corners as well.


My tag is intended for Christmas so I punched out a snowflake to jazz it up.


With your first piece of paper you want to pick one end to trim the corners off.  I kept the piece I cut off and flipped it over to use as a guide on the opposite side so my corners are the same size.  Hole punch the middle.

This is the paper you will stamp on as well.

Pick a coordinating ink to rub on the edges of your smaller two papers.  I like to add a little extra ink to the top too.


I used my glue runner to stick the smaller paper to the larger and I also gave it a squirt of Glimmer Mist before I added my last piece of paper.


Wrap your ribbon around the tag 3 or 4 times and use tape on the back to hold it in place.


Cut a ribbon about 5" long and insert through the hole.  
Stamp your tag.  You can use anything, Merry Christmas, Happy Birthday, Congratulations, etc....
Be sure to let the ink dry well before you do too much more with it.


Use a glue dot to adhere your decoration.


I also had a self stick gem I added to the middle of my snowflake to give a little extra sparkle.


Wednesday, November 7, 2012

Better Mopping

The Rubbermaid Reveal

Who likes to mop? I don't think I know anyone that would say yes to that.  Do you mop?  Of course.  
The process of getting your mop out and the bucket, getting the cleaner and hot water, etc.... can be such a pain.  Sometimes you just want, or need, a quick easy mop in between the times you go through the long process with the mop and bucket, or even hands and knees.

I have a Swifter Wet Jet.  I hated paying for the convience of the cleaner for it.  Also said cleaner would leave streaks all over my laminate wood floor.  What?!  I would buy wood floor cleaner, wood floor pads.  Still streaks, or cloudy, can't stand it.

On occasion I do try to do things in a little bit earth, home and budget friendlier of a way.  So I started to take my spray bottle of vinegar-water cleaner and spray the floor and use the Swifter Wet Jet and the pad and mop like that.
It was great for in between the big deep cleaning.  Awesome for when the pets come in muddy (I was talking about the kids.....;p).  Or spills.  Best of all, no streaks, no clouds, just beautiful shiny floor.

  Great I think to myself.  In the back of my mind I would try to figure out if there was a way I could refill those Wet Jet bottles.  One day I walked into Sams Club and there was the Rubbermaid Reveal.
Empty bottle, and not one, not two, but three, removeable, big, washable, reuseable floor pads.  For about $30.  Wahoo!  

I'm a sucker, yep there was a beautiful neon sign flashing my name and pointing arrows right at the display.  I ran over there and had one in my cart so fast my husband did a double take.  $30 for that?  I told him it was worth it if it works and walked away.  He doesn't clean the house.
I took it home and gave it a workout.  Ahhh, no streaks, no batteries, clean floor.


Over time my bottle started to look like this.  Lucky for me I found and extra bottle marked down somewhere (can't remember) and I bought it and stashed it, little did I know how soon I would need it.

TIP:  After you mop, pull the bottle off and open the lid to let air back in to the bottle.  Tighten back up and snap back into place.  This will prevent the above from happening.

Rubbermaid has made this product easy to use.  There are great directions on the bottle.  You can use any of your favorite cleaners in this bottle.  It tells you a ratio to use.  It also recommends having a few different bottles of cleaner ready and available for your different types of flooring.  My discounted replacement bottle was quite reasonable in price and the regular price isn't a whole lot more.


Happier mopping.


Wednesday, October 31, 2012

Trick or Treat!

Here are some cuties!


A few years ago I had a child dragging his bag on the pavement, since he was tired, and he lost a lot of candy.  So imagine the devastation we were dealing with!   
I decided enough of that!  We are going to use the reusable shopping bags for now on.  I was lucky enough to find these bags at our local grocery store and bought four (and so did my friend).  The next year I wrote names on the bottom of the handle so nobody was fighting about their candy bag.


I love these bags and I heard a few comments tonight about them and how cool they were.  Hopefully you'll be able to find some tomorrow during the day after Halloween sales that your checking out.  They may not be on clearance but they are really only a dollar or two so it's well worth it.  I have used these ones for 3 years now.  The bottoms are just starting to wear thin in a couple spots.  I will be looking for replacements tomorrow but I'm going to hold out for cool ones!  

Who's to say I can't lift up the black plastic bottom at throw down a piece of duct tape to cover that half inch slit on the bottom if I don't find that special Halloween bag?  If I could find some skull duct tape I would even stick it on the outside!

Hope you had a happy and safe Halloween.


Saturday, October 27, 2012

Sweet Crispix Mix


Remember back when you would go trick or treating and get popcorn balls?
If not, then your obviously not as old as me.

This is a super fun and easy treat to make for any occasion.  I was given this recipe many many years ago and every time I would make it, everyone loved it.  Well, I dug it out of the vault this afternoon and once again it was a hit for my gathering.
Maybe you want to give it a try for yours.

Unfortunately I don't have any other pictures because I didn't think of sharing it until after all was said and done.  Luckily it is easy so no worries, right?


Sweet Crispix Mix

Ingredients:
3/4 C butter
1 1/2 C brown sugar
1/4 C + 2 Tbsp corn syrup
1/2 tsp salt
1 1/2 tsp vanilla
1 1/2 baking soda
1- 12 oz box of Crispix
16 oz jar dry roasted peanuts
1- 12 oz bag plain M & M's
1- 12oz bag peanut M & M's

Directions:
1.  In a large microwaveable bowl add: butter, brown sugar, corn syrup, and salt.

2. Microwave for 2 minutes, stir.

3.  Do step two again.... Microwave 2 minutes and stir.

4.  Add in baking soda and vanilla and stir until light caramel look, it will get a little foamy.

5. In a paper bag add: cereal and peanuts (hint: you can do this while the caramel is cooking).

6.  Pour caramel mix over dry mix and shake bag.

7.  Microwave 90 seconds, shake bag.

8.  Do it again.... Microwave 90 seconds, shake the bag.

9.  Spread out thinly onto wax or parchment paper on counter (hint:  the more spread out it is, the less clumps you'll have

10.  When cooled completely add M & M's.

11.  Store in air tight container.


This recipe can be changed to your liking by adding pretzels or raisins, excluding peanuts, etc.  If you feel it's too much caramel, use a bigger box of cereal. 
 I also happened to be out of paper sacks so I used a large Tupperware bowl that had a lid for the shaking.  Make sure it fits in the microwave first and be sure to remove the lid before you microwave your mix.


Friday, October 26, 2012

Spiderweb Cupcakes


Who are these for????  Famous question in my house.   Life is so busy, anytime that I bake something there is usually a good reason.  It generally consists of giving the baked good away.  So my kids are always very excited when I can say, "for you guys".


Here's what you will need:
cupcakes
white, orange, purple, or green frosting
small amount of black frosting, small tube with a small circle tip or you will need a baggie
knife or toothpick

These are super easy!  Just whip up your favorite cupcake recipe and frost with your favorite frosting.


Get your black frosting.  I cheated and bought a tube of black for this batch since I didn't need very much at all.  You either want to put the frosting in a baggie and snip a very little hole or use a decorating tip with a small hole.  I like to practice my method on a paper plate first to get the right consistency.


Make some bullseyes.

I noticed that this tube of black frosting needs to be pushed down into the white just a little bit so the web turns out better, otherwise your black piping might roll as you pull the knife or toothpick through.
Wet your index finger and lightly tap the black piping down.

Then grab a butter knife or toothpick and start at the center of your bullseye and lightly drag a strait line out to the edge (you don't have to go too deep into the frosting), repeat 5 or 6 times.  You may need to wipe off the knife or toothpick several times to keep your work clean.

When your webs are done you can add a scary spider to the middle.

I was putting the black on these yesterday when my kids got home and my 9 year old son wanted to help.  He thought it was awesome!  This is easily a project that the kids would love to help with.