Wednesday, October 31, 2012

Trick or Treat!

Here are some cuties!


A few years ago I had a child dragging his bag on the pavement, since he was tired, and he lost a lot of candy.  So imagine the devastation we were dealing with!   
I decided enough of that!  We are going to use the reusable shopping bags for now on.  I was lucky enough to find these bags at our local grocery store and bought four (and so did my friend).  The next year I wrote names on the bottom of the handle so nobody was fighting about their candy bag.


I love these bags and I heard a few comments tonight about them and how cool they were.  Hopefully you'll be able to find some tomorrow during the day after Halloween sales that your checking out.  They may not be on clearance but they are really only a dollar or two so it's well worth it.  I have used these ones for 3 years now.  The bottoms are just starting to wear thin in a couple spots.  I will be looking for replacements tomorrow but I'm going to hold out for cool ones!  

Who's to say I can't lift up the black plastic bottom at throw down a piece of duct tape to cover that half inch slit on the bottom if I don't find that special Halloween bag?  If I could find some skull duct tape I would even stick it on the outside!

Hope you had a happy and safe Halloween.


Saturday, October 27, 2012

Sweet Crispix Mix


Remember back when you would go trick or treating and get popcorn balls?
If not, then your obviously not as old as me.

This is a super fun and easy treat to make for any occasion.  I was given this recipe many many years ago and every time I would make it, everyone loved it.  Well, I dug it out of the vault this afternoon and once again it was a hit for my gathering.
Maybe you want to give it a try for yours.

Unfortunately I don't have any other pictures because I didn't think of sharing it until after all was said and done.  Luckily it is easy so no worries, right?


Sweet Crispix Mix

Ingredients:
3/4 C butter
1 1/2 C brown sugar
1/4 C + 2 Tbsp corn syrup
1/2 tsp salt
1 1/2 tsp vanilla
1 1/2 baking soda
1- 12 oz box of Crispix
16 oz jar dry roasted peanuts
1- 12 oz bag plain M & M's
1- 12oz bag peanut M & M's

Directions:
1.  In a large microwaveable bowl add: butter, brown sugar, corn syrup, and salt.

2. Microwave for 2 minutes, stir.

3.  Do step two again.... Microwave 2 minutes and stir.

4.  Add in baking soda and vanilla and stir until light caramel look, it will get a little foamy.

5. In a paper bag add: cereal and peanuts (hint: you can do this while the caramel is cooking).

6.  Pour caramel mix over dry mix and shake bag.

7.  Microwave 90 seconds, shake bag.

8.  Do it again.... Microwave 90 seconds, shake the bag.

9.  Spread out thinly onto wax or parchment paper on counter (hint:  the more spread out it is, the less clumps you'll have

10.  When cooled completely add M & M's.

11.  Store in air tight container.


This recipe can be changed to your liking by adding pretzels or raisins, excluding peanuts, etc.  If you feel it's too much caramel, use a bigger box of cereal. 
 I also happened to be out of paper sacks so I used a large Tupperware bowl that had a lid for the shaking.  Make sure it fits in the microwave first and be sure to remove the lid before you microwave your mix.


Friday, October 26, 2012

Spiderweb Cupcakes


Who are these for????  Famous question in my house.   Life is so busy, anytime that I bake something there is usually a good reason.  It generally consists of giving the baked good away.  So my kids are always very excited when I can say, "for you guys".


Here's what you will need:
cupcakes
white, orange, purple, or green frosting
small amount of black frosting, small tube with a small circle tip or you will need a baggie
knife or toothpick

These are super easy!  Just whip up your favorite cupcake recipe and frost with your favorite frosting.


Get your black frosting.  I cheated and bought a tube of black for this batch since I didn't need very much at all.  You either want to put the frosting in a baggie and snip a very little hole or use a decorating tip with a small hole.  I like to practice my method on a paper plate first to get the right consistency.


Make some bullseyes.

I noticed that this tube of black frosting needs to be pushed down into the white just a little bit so the web turns out better, otherwise your black piping might roll as you pull the knife or toothpick through.
Wet your index finger and lightly tap the black piping down.

Then grab a butter knife or toothpick and start at the center of your bullseye and lightly drag a strait line out to the edge (you don't have to go too deep into the frosting), repeat 5 or 6 times.  You may need to wipe off the knife or toothpick several times to keep your work clean.

When your webs are done you can add a scary spider to the middle.

I was putting the black on these yesterday when my kids got home and my 9 year old son wanted to help.  He thought it was awesome!  This is easily a project that the kids would love to help with.


Monday, October 22, 2012

Scary Tree


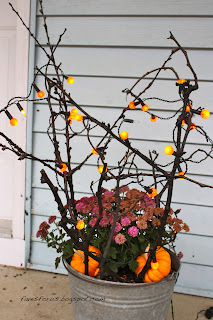
Well, it's not really a scary tree, but it could be!  I have seen these and they are so cute!  The idea?  Pick up stray branches from around your yard, spray paint them black and put them in a container of some sort and decorate.  I found my branches, on clearance last year after Halloween, at Kmart.  They have LED lights woven into them.  I definitely think that the random branches outside would be really a lot more cute than my long straggly branches.


I started out with a vase and wrapped orange paper around it and stuck it to the glass with double stick tape.


Then I wrapped the ribbon around to break up all the orange.  I cut the bats out on my Cricut and used wall tacky to stick them to my branches and vase.

 I let the kids stick the bats to the branches and turn it on.

Here is my outdoor one with spray painted branches.

Shazzaaam!  A cheap and cute Halloween project that is relatively easy!


Wednesday, October 17, 2012

Robot and Trash Can Costumes

The robot needs to take out the trash!
Savage Kids 2011

 Last Halloween I had a boy who wanted to be a robot and a girl who wanted to be a trash can.
Let the adventure begin!

Jer-bot robot
Jerod's costume didn't take much as you can imagine.  We have a box covered in foil and silver dryer duct tape.  We made some gauges put some fuses on him and used dryer vent hose for his arms.  And of course the Cricut came in handy to make the letters and circles that I cut in half for the gauges, as well as those cool arrows.

trash can girl
Shayla was my trash girl.  Her costume was a little more work but fun all the same.  Her father got to play with his sawzall and cut a big hole in the bottom of the can as well as a hole for her head.  We used pool noodles on the bottom of the can to protect her legs from the hard plastic and any sharp edges left behind.  (My kids are very hands on so she spray painted the purple noodle black to blend in, can't you tell?)  Also to make it a little easier on her we attached 2 big bungee cords to the bottom of her costume and she had noodles wrapped around those and wore the bungees in the fashion of suspenders so she wouldn't have the can pressing down on her shoulders too much.  She added the little "Candy Drop" hole herself since she didn't have arm holes she held her bag under the hole to catch her goodies.  And she also added the cockroaches.  Our cockroaches did not like to stick to that can though so we had some struggles with that.  It seems that clear packing tape worked the best.

The great thing is that the can is now used to put our soda cans in for recycling.  It works great to hold that huge black bag.  The kids like to keep the lid upside down for a funnel effect, until the can gets too full, then they flip it over.

These costumes were great, I love that the kids came up with the idea and helped out.  The hard thing for them was that they were rather limited on movement and took them off during festivities.  I wanted to get my garbage girl dingy and gross to go with the can but she said no way.  What fun is that?


Monday, October 15, 2012

Halloween Banner


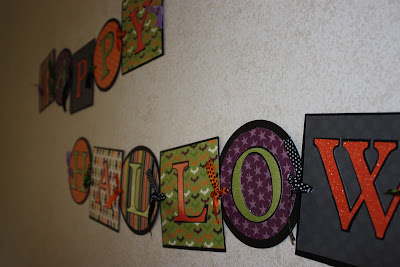
I really love the fall.  With the beautiful colors and more tolerable weather you just want to be outside more to enjoy it.  As far as scrap booking goes, Halloween is one of my favorite holidays to scrapbook. I love the rich oranges, greens and purples.  These colors definitely work together in my 
Happy Halloween banner.

laying out the paper 

Making the banner is actually quite easy, but it isn't a 5 minute project.  I cut all my circles and squares 5 1/2".  I made my Cricut do all the hard labor on that.  I also cut black circles and squares 5 3/4" to go behind my colorful ones so they would pop a just a little bit more.

I cut the letters in all capitals, choose your favorite font!  I also cut the same letter in Shadow on the Cricut to have the black one behind the colored one.  I used glittered paper and alternated lime green and orange.

I laid the letters out on top of my colored paper. 
I laid everything out on the table to make sure I thought all the colors went well together before I started to glue it all together.  No orange letters on orange shapes for me.  Once I was happy with my banner I started to stick the colored letter to the black letter.  Since I used glitter paper I needed a heavy duty adhesive to make sure the letters would stay stuck.  I used my Xyron 5" Permanent adhesive.  If you don't have one of these you might want to make that investment.  (I did put double sided tape on one of my letters and realized I don't have the time or patience for that process.)

I used double stick tape to put the colored shape onto black shape and made my hole punches for the ribbon.

 I eyeballed the holes for my hole puncher.  I didn't want them to all be exact so the irregularity would be played up.

tie letters together
I used a variety of colorful Halloween ribbon to tie my letters together.  I love ribbon!  Use fairly long pieces of at least 6" long to allow room for each letter to move independently from it's partner.  I like having longer pieces of ribbon between my letters on the banner but you can trim them to however long you want them.

close up
On the very ends of your banner you may want to tie on extra long ribbon to drape your banner across your window or mantel or hang on a couple of nails.  I used wall tacky on the back of each letter and stuck it to the wall.  You may also rather have one long banner instead of two.  Have fun!


Sunday, October 7, 2012

Zebra Theme


My oldest daughter is going to be turning 16 in just under a month.  As I rack my brain of something "COOL" to do for her "Sweet 16" I thought I would share with you the great zebra themed items I put together for her birthday last year.

Zebra magnet
This magnet was easy to make.  I bought a zebra print scrap of fabric (you can check your remnants section at your fave fabric store). Some clear flat rocks from the dollar store and round self-adhesive magnets.
The first step was to cut the fabric so I used on the rocks to trace circles onto the back of the fabric and cut.  I used glue to help it stick to the rock.  Once that was completely dry I added the magnet.  Now it's ready for it's first use.


Magnet boards
I made three magnet board out of round pizza pans that were on sale way cheap at the store.  I attached black fabric and glues it down on the back as well as the zebra print ribbon to hang with.  I also made some color coordinating flowers to jazz up the boards.  As you can see the magnets are working hard.
Full Length Mirror

My daughter has wanted a full length mirror for quite some time and I would occasionally catch her in my closet using mine.  I bought her a white one and used some double stick tape to adhere this awesome zebra ribbon, that my friend donated because she knew how cute it would turn out.  Be sure to cut your corners at a 45 degree angle so it will all lay nicely.  I did run the tape down the full length of each side so the ribbon wouldn't be tempted to loosen or sag.  And of course I had to add the cute flower in the corner.

In case you hadn't figured it out yet, her colors were zebra and hot pink.  So as another gift idea I gave her 10 yards of black tulle and 10 yards of hot pink.  She kept asking to paint her walls black and I just couldn't have that.  If you've ever painted over a dark color you know why.  My compromise was the tulle.  Together we draped it on her walls and used push pins to hold it up.  I think it made a great "girlie" effect and definitely made it more personalized.  I suggested to her if she wanted she could always adhere gems throughout the tulle to give it a little sparkle.

Monday, October 1, 2012

Hello

What is she doing starting another blog?  Those of you that know me are probably wondering about this.  Lately I have been feeling a little bored with my blog and wanted to expand my horizons.  How many times do you want to read about Shayla's volleyball game or Jerod's basketball game if they do it every year.  I do plan to continue putting posts on my other blog, mostly for my kids, so they can look back at it some day.  I think the grandparents enjoy it as well.

I was hoping that I might be able to be helpful to someone through my life experiences by creating a whole new blog.  I have been told numerous times how organized I am, or creative.  Well, if you say so.  I decided if that is the case, maybe I should put some of those ideas out there for everyone to decide if they can use them or not.  After 18 years of marriage and 4 kids I have figured out enough that we are still surviving.

I am hoping to share some of my favorite recipes on occasion, crafts, organizing ideas, favorite products that I will review, and anything else that might pop into my head, so maybe it won't keep me up at night.

I am pretty excited and thought this would be a lot of fun.  I hope you think so too.

Thanks for checking me out,
Holly